Monday, September 1, 2014

My Return

I have not blogged for over two years now. To my followers I am very sorry. I have been going through some difficulties that had made me withdraw and feel that my work was less than adequate. I have been knitting and crocheting off and on for more than 30 years and thought of myself as still a beginner. I have found I am not so much of a beginner as I lead myself to believe. I know that there are plenty of other bloggers that knit and crochet, test yarn, make patterns and create beautiful pieces and I guess I have had too many interests to just focus on only that in my blog. I would like to start out fresh again and try to keep things well rounded. The title here just doesn't fit so I will be starting a new blog soon. I want to include my gardening, upcycling/recycling old things, cleaning tips and a splash of my personal life (which isn't that impressive because I am a bit of a hermit).
Until I get it up and running I would like to share a few pictures with you of some of the things I have made over this past year.
I have more, but I need to organize them. I also plan to learn how to write my own patterns by the end of this year.
  Thank you for dropping by and I hope you check out the new blog when I get it going.
      ~Dee Dee

Monday, May 28, 2012

Seedling and Rooting Update

I have the seedlings transplanted and I am acclimating them to the outdoors now.

The strawberries are still very small but should start taking off now.

I have put the pineapple seedlings in their own little containers. I am using recycled pint sized cream cartons for them.

The pineapple tops that I have rooted are also in their own pots now.

I recently bought an organic lemon. It was very small and had wonderful seeds inside, so I planted six seeds and so far three have taken to root. Here is one of them.
I am hoping I can keep it trimmed and grow it as a miniature lemon tree so that I can bring it indoors in the winter.
My tomato and pepper plants are doing very well.
So are my leeks!

Today I put some apple seeds in pots to see if they will grow. They will be planted on the grove side of my house with the plum tree that I started and the cherry tree that has been growing for a few years.

This coming week is going to be dedicated to working outside in the garden. My aim is to make it a cozy and useful space.

Thanks for stopping by!
Dee Dee

The Phone Booth


Friday, April 20, 2012

Help in the Bathroom and Seedling Update

This post is for those that worry about stock piling enough toilet paper for a crisis.
I am also adding in some extras as well.


In the center is a cleansing bottle. Many hospitals give these to new mothers. I have kept mine and continue to use it for cleansing. If you do not have one of these you could use something like a dish soap bottle as the blue one just to the left of center. There are many other plastic bottles that can be used for cleansing yourself after you do your business.

For basic use, warm water does a fine job of spraying off the "cling-ons" and reduces the amount of toilet paper needed. Most of the time you will be clean enough to just dry off.

What if you run out of toilet paper?
It is a good idea to keep old clothing, sheets, and other cloth and cut them into "do rags" about the size of a washcloth. Get a special container to stack them in and keep within reach of the toilet. Keep a pail near the toilet for soiled rags. As long as you use a cleansing bottle the do rags should not have much of a smell. When they do smell add warm (not hot) water to the pail and pour in a small amount of bleach. Let soak for no more than one hour and proceed to washing them to use over.

Now let's talk about the bottle of witch hazel. Why is that in the picture? Well, if a person should have hemorrhoids, adding one ounce of witch hazel to your cleansing bottle and filling the rest with warm water can make you feel better. Just do a quick test to make sure you are not too sensitive to it.

Now on to the bottle of apple cider vinegar. There are certain conditions that the ladies can get that can be very uncomfortable as well. One ounce of Apple Cider Vinegar (please not the white vinegar)  to 7 ounces of warm water to cleanse with can help you. This you must also test for sensitivity. There may be a slight sting, if it stings too much use less ACV to water or stop and see a doctor. Use after each visit to the toilet. This is not for every female problem and if your condition continues after a couple of days or get worse seek medical attention. Make sure you use raw, organic apple cider vinegar for this. And treating at the first signs of an itch is the best. Never use full strength ACV. 

NEVER USE RUBBING ALCOHOL IN YOUR CLEANSING BOTTLE

The hydrogen peroxide is not for the cleansing bottle either, it is used for cleaning blood from cloth bandages and such before bleaching and washing.

If you would rather use leaves of a pine cone to clean yourself when you run out of TP that's your call. I would prefer the do rags.


SEEDLING UPDATE
Between the two seedlings is a very tiny green speck of a new sprout. There are also two red dots between the large plant and the green speck that are pineapple seeds as well.

And I have pepper plants that are sprouting here too.
I put them outside every day that it is warm enough and bring them in at night.
I have also started broccoli, cabbage, and leeks. I will be starting herbs and other things soon. I am running out of counter space.

I need to go work on my garden. Enjoy your day!

Thank you for reading my blog!
Dee Dee

Friday, April 13, 2012

Starting to Grow Pineapples

Looking out my window I mostly see white right now. It is not because I am seeing a white sandy beach, it's snow, and being February it won't be getting green anytime soon here. [Actually, our weather has been very strange here and in April the grass is green, my cherry tree has blossoms, the ice has been off the lakes since the beginning of March. The ice covers the lakes here usually until the end of April, sometimes later.]
 Well, outside may be winter, but inside I am having a little bit of the tropics.

Since I am home schooling my daughter I figured she can learn agriculture for science. We have been trying for awhile to root these tops. Many have been unsuccessful. I have tried cutting off the top, leaving a little bit of the fruit on it and just sticking in soil, which some people say works great but it didn't work for me. I will share here what is working so far. I have gone through five fresh pineapples this winter in the process. 
Below is the 5th top I have started. Sorry that they are not in order.


This looks like it will be a success. 


At this point I let this air dry for one day.

 I have tried to let them dry longer and they die.
The one below was left to dry for two days. It is the 4th one and I started it on January 27th.

I do have this in water right now but it doesn't look hopeful. The center leaves have all died out and there is no sign of roots.

Here is number three which I started 3 weeks earlier. Started on January 6th, 2012.
Here you can see the roots starting.
This one I let dry for one day before setting it in a glass of water.
I change the water everyday. That is right, every day. I found out from number 1 that changing it every other day or more is a bad idea. 

I started number 5 yesterday. One thing you should know before you decide to grow your own, is pineapples can be vicious.
Look at these teeth!
Those can get you by surprise! These are usually found closer to the tips.
I cut off the dead parts of the leaves so that we can keep track of whether the plant is doing okay or not.

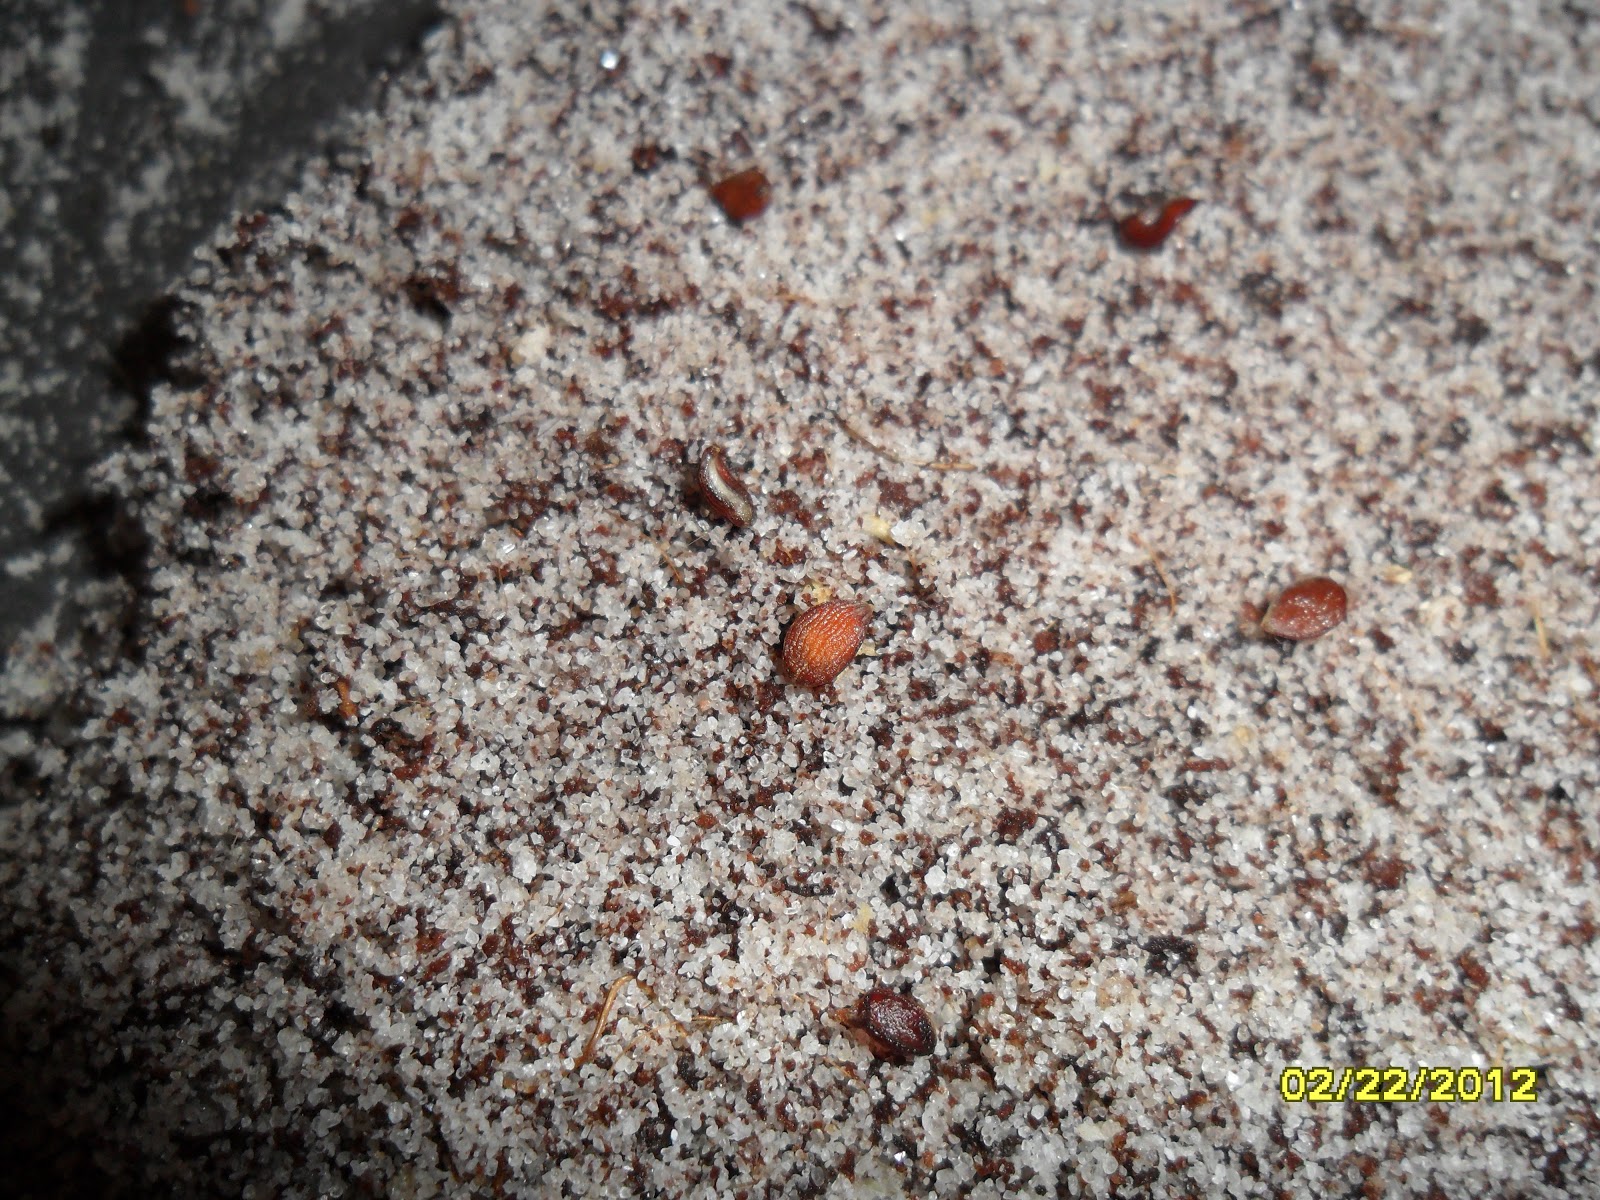
Now on to the pineapple seeds.
The larger seed is from a pineapple. The small seeds are alpine strawberry seeds.
We recycled some sand from a hermit crab tank and mixed in some moistened peat moss. This is on a foam tray that had produce on it.
Here you can see the pineapple seeds. We also planted the strawberry seeds but they are too tiny to see. The seeds are left uncovered. I placed a tall rectangular plastic box over top to keep the moisture in and I watered it from the outside. Later I started to sprinkle water on top as well as the seedlings emerged. I also put a thin layer of the potting mix over the seeds as well.

The water seeps under the plastic and the sand/peat mix wicks it up.
I placed this next to a south facing window and watched for heat stress during sunny days.

A month and a half later, this is the first one to sprout.
Here you can barely see a fleck of green that is another pineapple sprouting.
They sure can take a very long time to come up.
So, if you are interested in growing your own pineapples, give it a try. And try growing both the tops and the seeds. If one fails you still have a backup.
Out of all of the tops I have tried to start only 2 have made it to the point of having roots. I will be putting them in pots shortly and when the weather warms up more I will set them outside.
Oh, and the strawberry seeds...
They are coming along nicely. I plant to put those in an Aquaponic system when I get it set up.
Yummy, strawberries and pineapple!
Good luck with yours!


Thank you for stopping by.
Dee Dee

Wednesday, January 18, 2012

SOPA/PIPA How it will affect this blog.

I have decided that if SOPA and PIPA pass through, I will be deleting my blogs and all posts before the government decides they will. I have done what I could, made the phone calls I needed to. I believe that censorship is a personal responsibility and I try to choose wisely what I post. I believe that sharing information with others freely is for the good of all, so others can learn and lift themselves up. These laws and not all about piracy, just as the NDAA is not about terrorism. It's about limiting personal and Constitutional rights.
That only reason I have not blacked out my blog for the day as so many others are in protest, is to let you all have access for at least one more day of my freedom of speech.
I fully support those fighting this.
So think about what you have been denied access to today and what you will lose access to, and then do something.

Thank you for stopping by.
Dee Dee

Sunday, November 27, 2011

Homemade Gravy, Gluten Free


Sometimes when roasting meats you end up with more drippings and juices than you can use to make gravy for the meal. That is what happened with my Thanksgiving turkey meal. So I saved the remaining juices in the fridge until it was time to reheat the leftovers of the meal. This can be done with a Beef roast as well. More on this at the bottom.

The juices formed two layers, the top is fat and the bottom is broth. I removed the hardened fat and placed in a container to use later for frying potato pancakes in. 

The broth gels in the fridge but melts to a liquid fast.

While it is starting to simmer, mix one and a half Tablespoons of gluten free Corn Starch in a cup of Cold Water. Once the broth has reduced slightly, slowly pour the corn starch water mix into the broth and stir constantly. Bring back to a boil and then reduce heat to simmer. Stirring helps to keep it from getting lumpy.
When the gravy thickens remove from heat. It will thicken more as it cools.

When I have leftovers I try to package them up in single servings to either freeze or put in the fridge.
I used foil for these since I no longer have a microwave oven. The meal goes in the oven at 325 degrees F while I am making the gravy. I will have to invest in some single serving size glass bakeware to cut down on waste.
 Pour gravy over your meal and enjoy.
I like freshly made gravy over whipped potatoes and turkey.

You can either put this onto a plate or save the clean up time and eat it like a TV dinner.
Making your own gravy is not only easy and fresh, you know what is in it and often times it is healthier for you and it tastes great.

To get the most out of your roast drippings, pour all (if any) liquids into a container. There will most likely be some browned drippings stuck to the bottom of the roasting pan. These often times pack the most flavor. Pour a cup or two of hot water in the pan and use a spatula or fork to scrape the bottom of the pan and this will help to clean your roasting pan later. Once everything is off the bottom add this to the other liquids.

If you have used any oil or butter on the meat you are roasting the fat content will be higher which is why I will put it in the fridge and make gravy later. The fat is easier to remove once it firms up.

The gravy I have made is very simple and needs no other ingredients. However, there are some times that I will add different things like a red or white wine or sherry, Worchestershire sauce, cream and/or other flavorings. I never salt or pepper the gravy. More than enough comes off the meat while roasting and adding it to the gravy will take away from the natural flavorings not enhance it. When there is black pepper in a gravy it makes me wonder if the cook is trying to hide something. Salt and pepper are best left added by the person consuming since each person has different likes and dietary needs.

Many people use all purpose flour to thicken their gravy. Gravy made with flour can also be delicious but since my new son can not have gluten I will be using corn starch for gravies.
I also prefer using REAL instant potato flakes to make a gravy for pork roasts. Some people use the water from boiling potatoes as a thickener.

So my Dear ones, if you have broth or stock left over from cooking, please do not pour it down the drain. Put it in a jar or container and either freeze it or put it in the fridge and make gravy with it.
During the depression and WW2 our family would pour gravy over a slice of bread for a meal. They would make sure the gravy drippings had lots of meat chunks in it for protein. Cream was added as well, for calcium and protein, not to mention flavor. The gravy would help revive stale bread in those days. Those were the "shingle" days.

Thank you for stopping by.
Dee Dee