Friday, April 13, 2012

Starting to Grow Pineapples

Looking out my window I mostly see white right now. It is not because I am seeing a white sandy beach, it's snow, and being February it won't be getting green anytime soon here. [Actually, our weather has been very strange here and in April the grass is green, my cherry tree has blossoms, the ice has been off the lakes since the beginning of March. The ice covers the lakes here usually until the end of April, sometimes later.]
 Well, outside may be winter, but inside I am having a little bit of the tropics.

Since I am home schooling my daughter I figured she can learn agriculture for science. We have been trying for awhile to root these tops. Many have been unsuccessful. I have tried cutting off the top, leaving a little bit of the fruit on it and just sticking in soil, which some people say works great but it didn't work for me. I will share here what is working so far. I have gone through five fresh pineapples this winter in the process. 
Below is the 5th top I have started. Sorry that they are not in order.


This looks like it will be a success. 


At this point I let this air dry for one day.

 I have tried to let them dry longer and they die.
The one below was left to dry for two days. It is the 4th one and I started it on January 27th.

I do have this in water right now but it doesn't look hopeful. The center leaves have all died out and there is no sign of roots.

Here is number three which I started 3 weeks earlier. Started on January 6th, 2012.
Here you can see the roots starting.
This one I let dry for one day before setting it in a glass of water.
I change the water everyday. That is right, every day. I found out from number 1 that changing it every other day or more is a bad idea. 

I started number 5 yesterday. One thing you should know before you decide to grow your own, is pineapples can be vicious.
Look at these teeth!
Those can get you by surprise! These are usually found closer to the tips.
I cut off the dead parts of the leaves so that we can keep track of whether the plant is doing okay or not.

Now on to the pineapple seeds.
The larger seed is from a pineapple. The small seeds are alpine strawberry seeds.
We recycled some sand from a hermit crab tank and mixed in some moistened peat moss. This is on a foam tray that had produce on it.
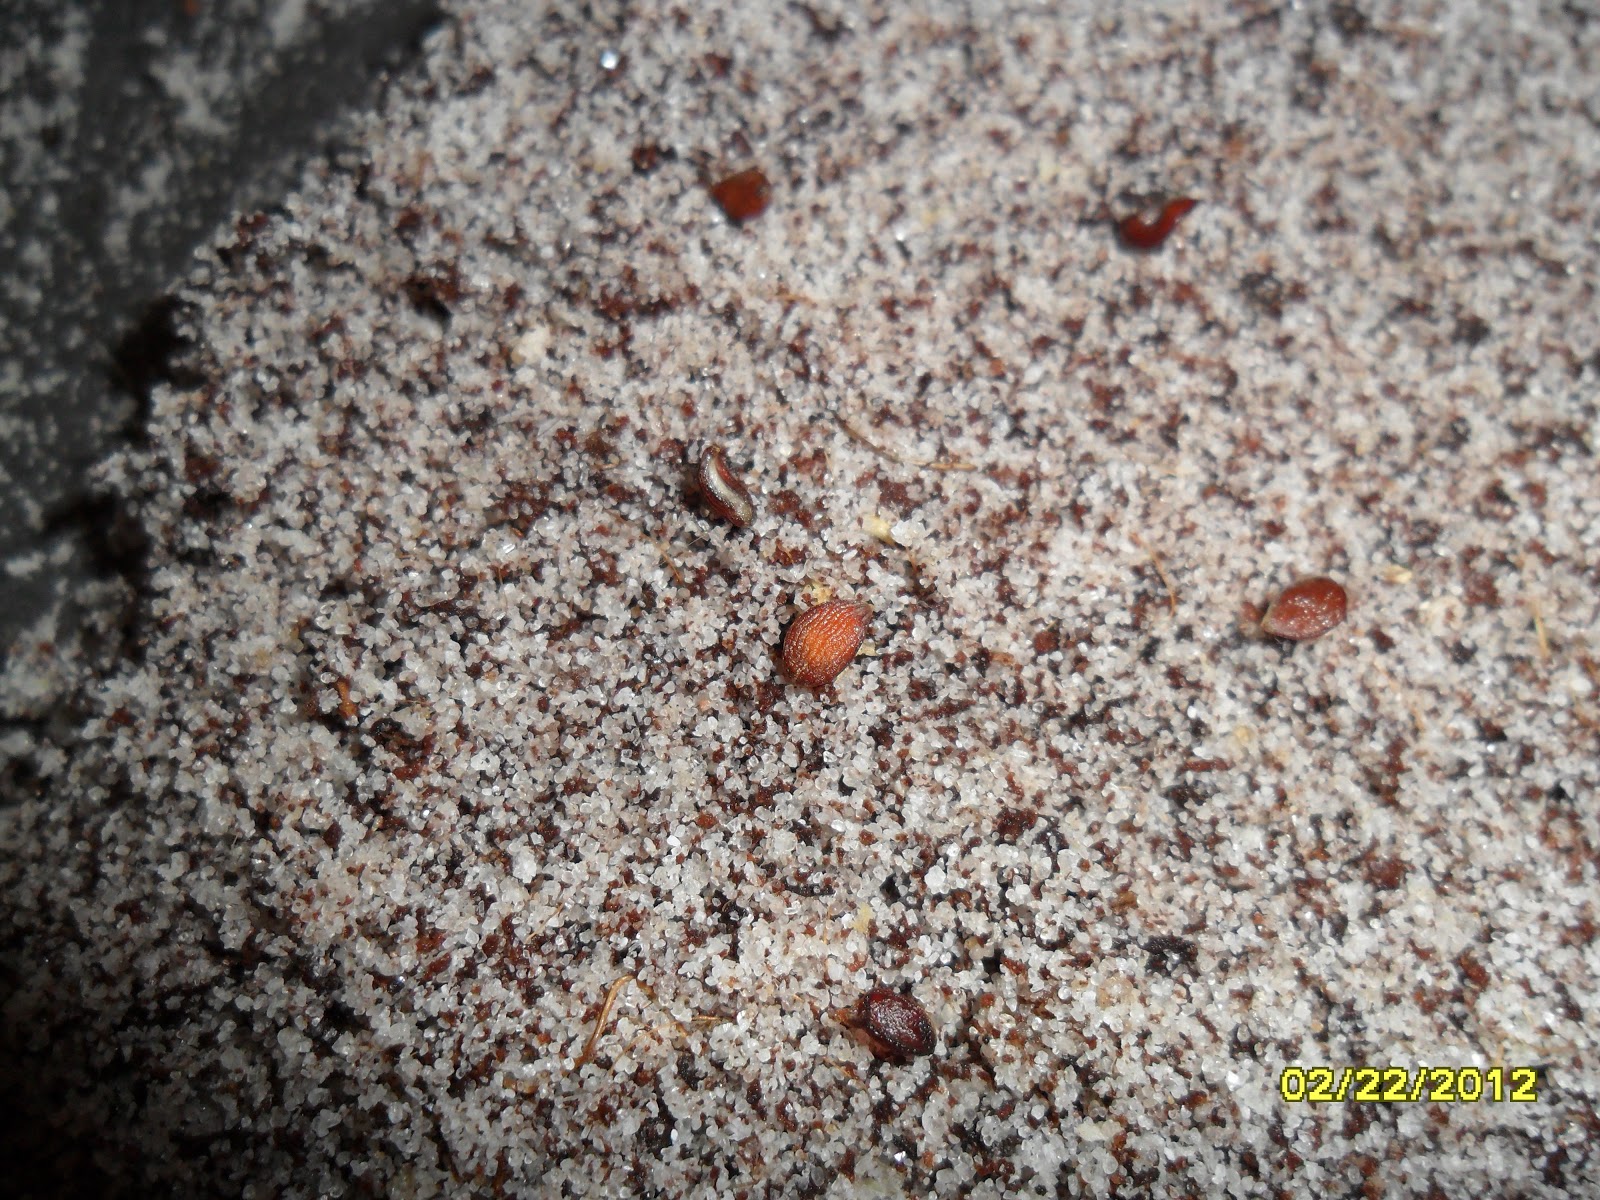
Here you can see the pineapple seeds. We also planted the strawberry seeds but they are too tiny to see. The seeds are left uncovered. I placed a tall rectangular plastic box over top to keep the moisture in and I watered it from the outside. Later I started to sprinkle water on top as well as the seedlings emerged. I also put a thin layer of the potting mix over the seeds as well.

The water seeps under the plastic and the sand/peat mix wicks it up.
I placed this next to a south facing window and watched for heat stress during sunny days.

A month and a half later, this is the first one to sprout.
Here you can barely see a fleck of green that is another pineapple sprouting.
They sure can take a very long time to come up.
So, if you are interested in growing your own pineapples, give it a try. And try growing both the tops and the seeds. If one fails you still have a backup.
Out of all of the tops I have tried to start only 2 have made it to the point of having roots. I will be putting them in pots shortly and when the weather warms up more I will set them outside.
Oh, and the strawberry seeds...
They are coming along nicely. I plant to put those in an Aquaponic system when I get it set up.
Yummy, strawberries and pineapple!
Good luck with yours!


Thank you for stopping by.
Dee Dee

Wednesday, January 18, 2012

SOPA/PIPA How it will affect this blog.

I have decided that if SOPA and PIPA pass through, I will be deleting my blogs and all posts before the government decides they will. I have done what I could, made the phone calls I needed to. I believe that censorship is a personal responsibility and I try to choose wisely what I post. I believe that sharing information with others freely is for the good of all, so others can learn and lift themselves up. These laws and not all about piracy, just as the NDAA is not about terrorism. It's about limiting personal and Constitutional rights.
That only reason I have not blacked out my blog for the day as so many others are in protest, is to let you all have access for at least one more day of my freedom of speech.
I fully support those fighting this.
So think about what you have been denied access to today and what you will lose access to, and then do something.

Thank you for stopping by.
Dee Dee

Sunday, November 27, 2011

Homemade Gravy, Gluten Free


Sometimes when roasting meats you end up with more drippings and juices than you can use to make gravy for the meal. That is what happened with my Thanksgiving turkey meal. So I saved the remaining juices in the fridge until it was time to reheat the leftovers of the meal. This can be done with a Beef roast as well. More on this at the bottom.

The juices formed two layers, the top is fat and the bottom is broth. I removed the hardened fat and placed in a container to use later for frying potato pancakes in. 

The broth gels in the fridge but melts to a liquid fast.

While it is starting to simmer, mix one and a half Tablespoons of gluten free Corn Starch in a cup of Cold Water. Once the broth has reduced slightly, slowly pour the corn starch water mix into the broth and stir constantly. Bring back to a boil and then reduce heat to simmer. Stirring helps to keep it from getting lumpy.
When the gravy thickens remove from heat. It will thicken more as it cools.

When I have leftovers I try to package them up in single servings to either freeze or put in the fridge.
I used foil for these since I no longer have a microwave oven. The meal goes in the oven at 325 degrees F while I am making the gravy. I will have to invest in some single serving size glass bakeware to cut down on waste.
 Pour gravy over your meal and enjoy.
I like freshly made gravy over whipped potatoes and turkey.

You can either put this onto a plate or save the clean up time and eat it like a TV dinner.
Making your own gravy is not only easy and fresh, you know what is in it and often times it is healthier for you and it tastes great.

To get the most out of your roast drippings, pour all (if any) liquids into a container. There will most likely be some browned drippings stuck to the bottom of the roasting pan. These often times pack the most flavor. Pour a cup or two of hot water in the pan and use a spatula or fork to scrape the bottom of the pan and this will help to clean your roasting pan later. Once everything is off the bottom add this to the other liquids.

If you have used any oil or butter on the meat you are roasting the fat content will be higher which is why I will put it in the fridge and make gravy later. The fat is easier to remove once it firms up.

The gravy I have made is very simple and needs no other ingredients. However, there are some times that I will add different things like a red or white wine or sherry, Worchestershire sauce, cream and/or other flavorings. I never salt or pepper the gravy. More than enough comes off the meat while roasting and adding it to the gravy will take away from the natural flavorings not enhance it. When there is black pepper in a gravy it makes me wonder if the cook is trying to hide something. Salt and pepper are best left added by the person consuming since each person has different likes and dietary needs.

Many people use all purpose flour to thicken their gravy. Gravy made with flour can also be delicious but since my new son can not have gluten I will be using corn starch for gravies.
I also prefer using REAL instant potato flakes to make a gravy for pork roasts. Some people use the water from boiling potatoes as a thickener.

So my Dear ones, if you have broth or stock left over from cooking, please do not pour it down the drain. Put it in a jar or container and either freeze it or put it in the fridge and make gravy with it.
During the depression and WW2 our family would pour gravy over a slice of bread for a meal. They would make sure the gravy drippings had lots of meat chunks in it for protein. Cream was added as well, for calcium and protein, not to mention flavor. The gravy would help revive stale bread in those days. Those were the "shingle" days.

Thank you for stopping by.
Dee Dee

Tuesday, November 8, 2011

Making Decorations For The Wedding Reception

My oldest daughter is getting married this Friday and I have volunteered to help with the decorations. Okay, it was more like I insisted.
I have been busy with this so I haven't had much time to blog lately.
For the reception hall I want to make two decorative trees that will have lights on them.
Since love is the theme here, my daughter helped me decide on making hearts.

I was thinking about making the hearts with paper mache but I realized I don't have enough time for that so I decided to use Sculpey clay. I had two of my dear friends come over and help me make the hearts. They rolled the clay to form two long "snakes" and then twisted them together, this represents two hearts as one.

 Then we shaped them into hearts and set on foil lined baking sheets. I poked a hole at the top of the heart for hanging them and to attach a crystal in the middle.
When we got them all done they when into the oven to bake and harden.
Here is what they looked like right from the oven.


Then I painted them white.
This next picture is with one unpainted next to one painted.


I used acrylic paint because it dries fast.
After I got both side of the hearts painted I brushed white glue on them with a small paint brush and sprinkled clear crystal glitter on them.


Now we are ready for the crystals.
The crystals are being recycled from an old chandelier that was no longer functional. Most of them are the squares with the rectangle prism. There were only three with the circle on top.


I separated the squares and removed the metal wire. Then I recycled old fishing line to hang the squares inside the hearts.


I have made 44 of these and they will hang on two small trees. I will post more on the trees and decorations after the wedding complete with photos.
Until then, thank you for stopping by.

Dee Dee

Tuesday, October 11, 2011

Red Heart Soft yarn Android Hat

I saw this pattern a while back and recently a friend asked me to make this for him. So off I went to the store to buy the yarn. It is Red Heart Soft. And this time I think Red Heart got it right. This yarn is soft. Not the softest ever, but much nicer than their Super Saver yarn.
It is a very easy yarn to work with.
by BAGLEYBIKER.

It is a very fast hat to crochet and sew together.
Here it is before the arms get sewed on.
Since I started this one I have gotten a request for another. 
It's a fun project and I recommend it to anyone looking for a neat present to give an android enthusiast this winter.
The pattern was easy to understand and it is a great beginner project.

One thing that would top this off is a matching neck cowl!

Thanks to BagleyBiker and thank you for stopping by

Dee Dee

Monday, October 3, 2011

Pre-Filter Your Water

Many people send a lot of money for a good water filter for camping and emergencies. Some of those filters are really great and can filter out the smallest of particles.
I am no expert at water filtration devices. I leave that to my friend Steve Spence at
He has so much information on his site regarding eco-friendly solutions to reduce energy consumption and more.

If you have a Berkey water filter, or any other type of filter, you want it to last as long as possible. A good way to extend the life of your water filter is to pre-filter the water.

In case you haven't noticed this about me, I like to find other uses for things I have.
I have some non-electric drip coffee "makers" that I use to filter so much more than coffee.

I use the white ceramic one for filtering hot bacon grease and for filtering maple tree sap for making syrup. The center is a reusable filter that I am not impressed with and don't recommend. The paper filters are natural non-bleached and thou I like environmentally healthy things, these impart a flavor that is less than desirable. I would go with the bleached ones for making coffee or filtering water.
The dark plastic one is what I have for my survival pack.
It is very durable and light weight and I don't have to worry about it shattering.


I use this to pre-filter water before using my other water filters. If you don't have any paper filters you can either use a clean T-shirt or a clean sock in place of the paper. Even if your clothes are not clean, hopefully you will be running it through a better filter to take out the rest of the nasties. Just think hard before using a dirty sock, please. I can't guarantee THAT won't impart a less than desirable taste. And isn't the point of filtering water partly for a refreshing drink or preparing tasty food?

Okay, just get some good paper filters and leave your socks out of it.


Thank you for stopping by.
Dee Dee


The Firefly Emerges With A Hand Drill

Making a fire may be the most important survival skill one can possess.
I have seen people start fire with a many different techniques, the simplest being a lighter, but I wanted to test an idea I had using the hand drill from my survival pack.
So here I present to you, with pictures, the results of my test.

Here is the hand drill.


I collected tinder of milkweed silk, birch bark, dried pine needles and shredded soft wood.
The pine needles and shredded wood are in there.

Then I took a twig that was dried, strong enough and small enough to fit into the drill and used my knife to make a point on it, put it in the drill and tightened it in.
Try to find one that is fairly straight.

You can use your knife to make a slight indentation on your flat wood so that the tip of the twig doesn't dance around. Since I used a thin top piece and a thicker bottom piece of wood I stuck some tinder between the two pieces of wood before I started drilling.
Under this top thin wood strip is birch bark. Below that is milkweed silk, pine needles and some wood shavings. I had to push out the milkweed silk from near the drilling point as the silk would wrap around the  wooden stick and insulate it, keeping it from getting hot enough. I held the top piece of wood in place by placing my foot on the far end of it.
You can see how the drill heats the wood and the charred shavings around the beginning of the hole. What I didn't catch on camera is the smoke it made. The stick ended up boring a hole through the top layer and then down to the bottom layer. It did take a few times to get the kindling to finally spark, I spent about 20 minutes with this first attempt.
The birch bark really made the fire take off. It didn't give me any time to capture the smoking before igniting.
I did this test in my garage since it is a windy day and I didn't want to start fire to the neighborhood. After it started I dumped it on the bare garage floor, I sure hope my husband doesn't mind the scorch mark. Ooops! 
Here you can see the several indents on the larger board from moving the drill around. I am not sure which one actually sparked the fire. I am pretty sure that the wood shavings are what caught fire first and then the rest of the kindling made it burst. Be careful with the tip of the drill stick, it gets very hot and can burn you even if it doesn't look hot or is smoking.

An additional note on milkweed silk.
Milkweed silk will ignite almost like black powder, with a burst! Use extreme care when using it for tinder. It also has an insulation property that is said to be warmer than goose down. It was used for life jackets during WW2 as one pound can keep a 100 to 150 pound man afloat for a few hours.
Milkweed is vital to monarch butterflies, so if you are going to use some for kindling please take the seeds off the silk first and spread them where they can grow uninterrupted. I collect the seed pods before they open and release the seeds so that I can contain the seeds and plant them where I want them for the butterflies.
The stem of milkweed is a wonderful source for cordage. It makes a very strong twine when spun right.
The sappy milk is said to be a great remedy for poison ivy.

Kindling will vary on where you are. Get to know some of the native plants in your area so that you won't be drilling for nothing.

So in conclusion the hand drill; worked to start a fire, was fairly fast, was a bit of a lower arm workout, and can be used for more than just the purpose of drilling holes. I am very glad that I decided to get one for my survival pack.

If you have ever used a bow drill for starting a fire, this should be a piece of cake for you.
I hope this has been helpful to you. I find a campfire to be very cozy especially with some fish planked next to it and some camp bread slowly roast over it.

Thank you for stopping by.
Dee Dee